Builder David Kragnes has sent two useful topics. First, after reading about Mark Richardson’s process for making wingtip light mounts in the Fourth Quarter 2025 Beartracks, David sent in his process. He embedded a piece of plywood into the fiberglass permanently. David writes, “I traced around the light on plywood, 3/8 is thick enough, then cut with 3/16 inch extra around the shape. Next trace the shape to the fiberglass wing tip. Align with the center line, then use a die grinder to trim out the tip to the plywood shape. Be careful to make a tight fit. With the outside of the plywood flush, mix up some epoxy and thickening to make a filler around the inside and outside. Sand to smooth transition. Light, strong, way less work than making a form then a faring.
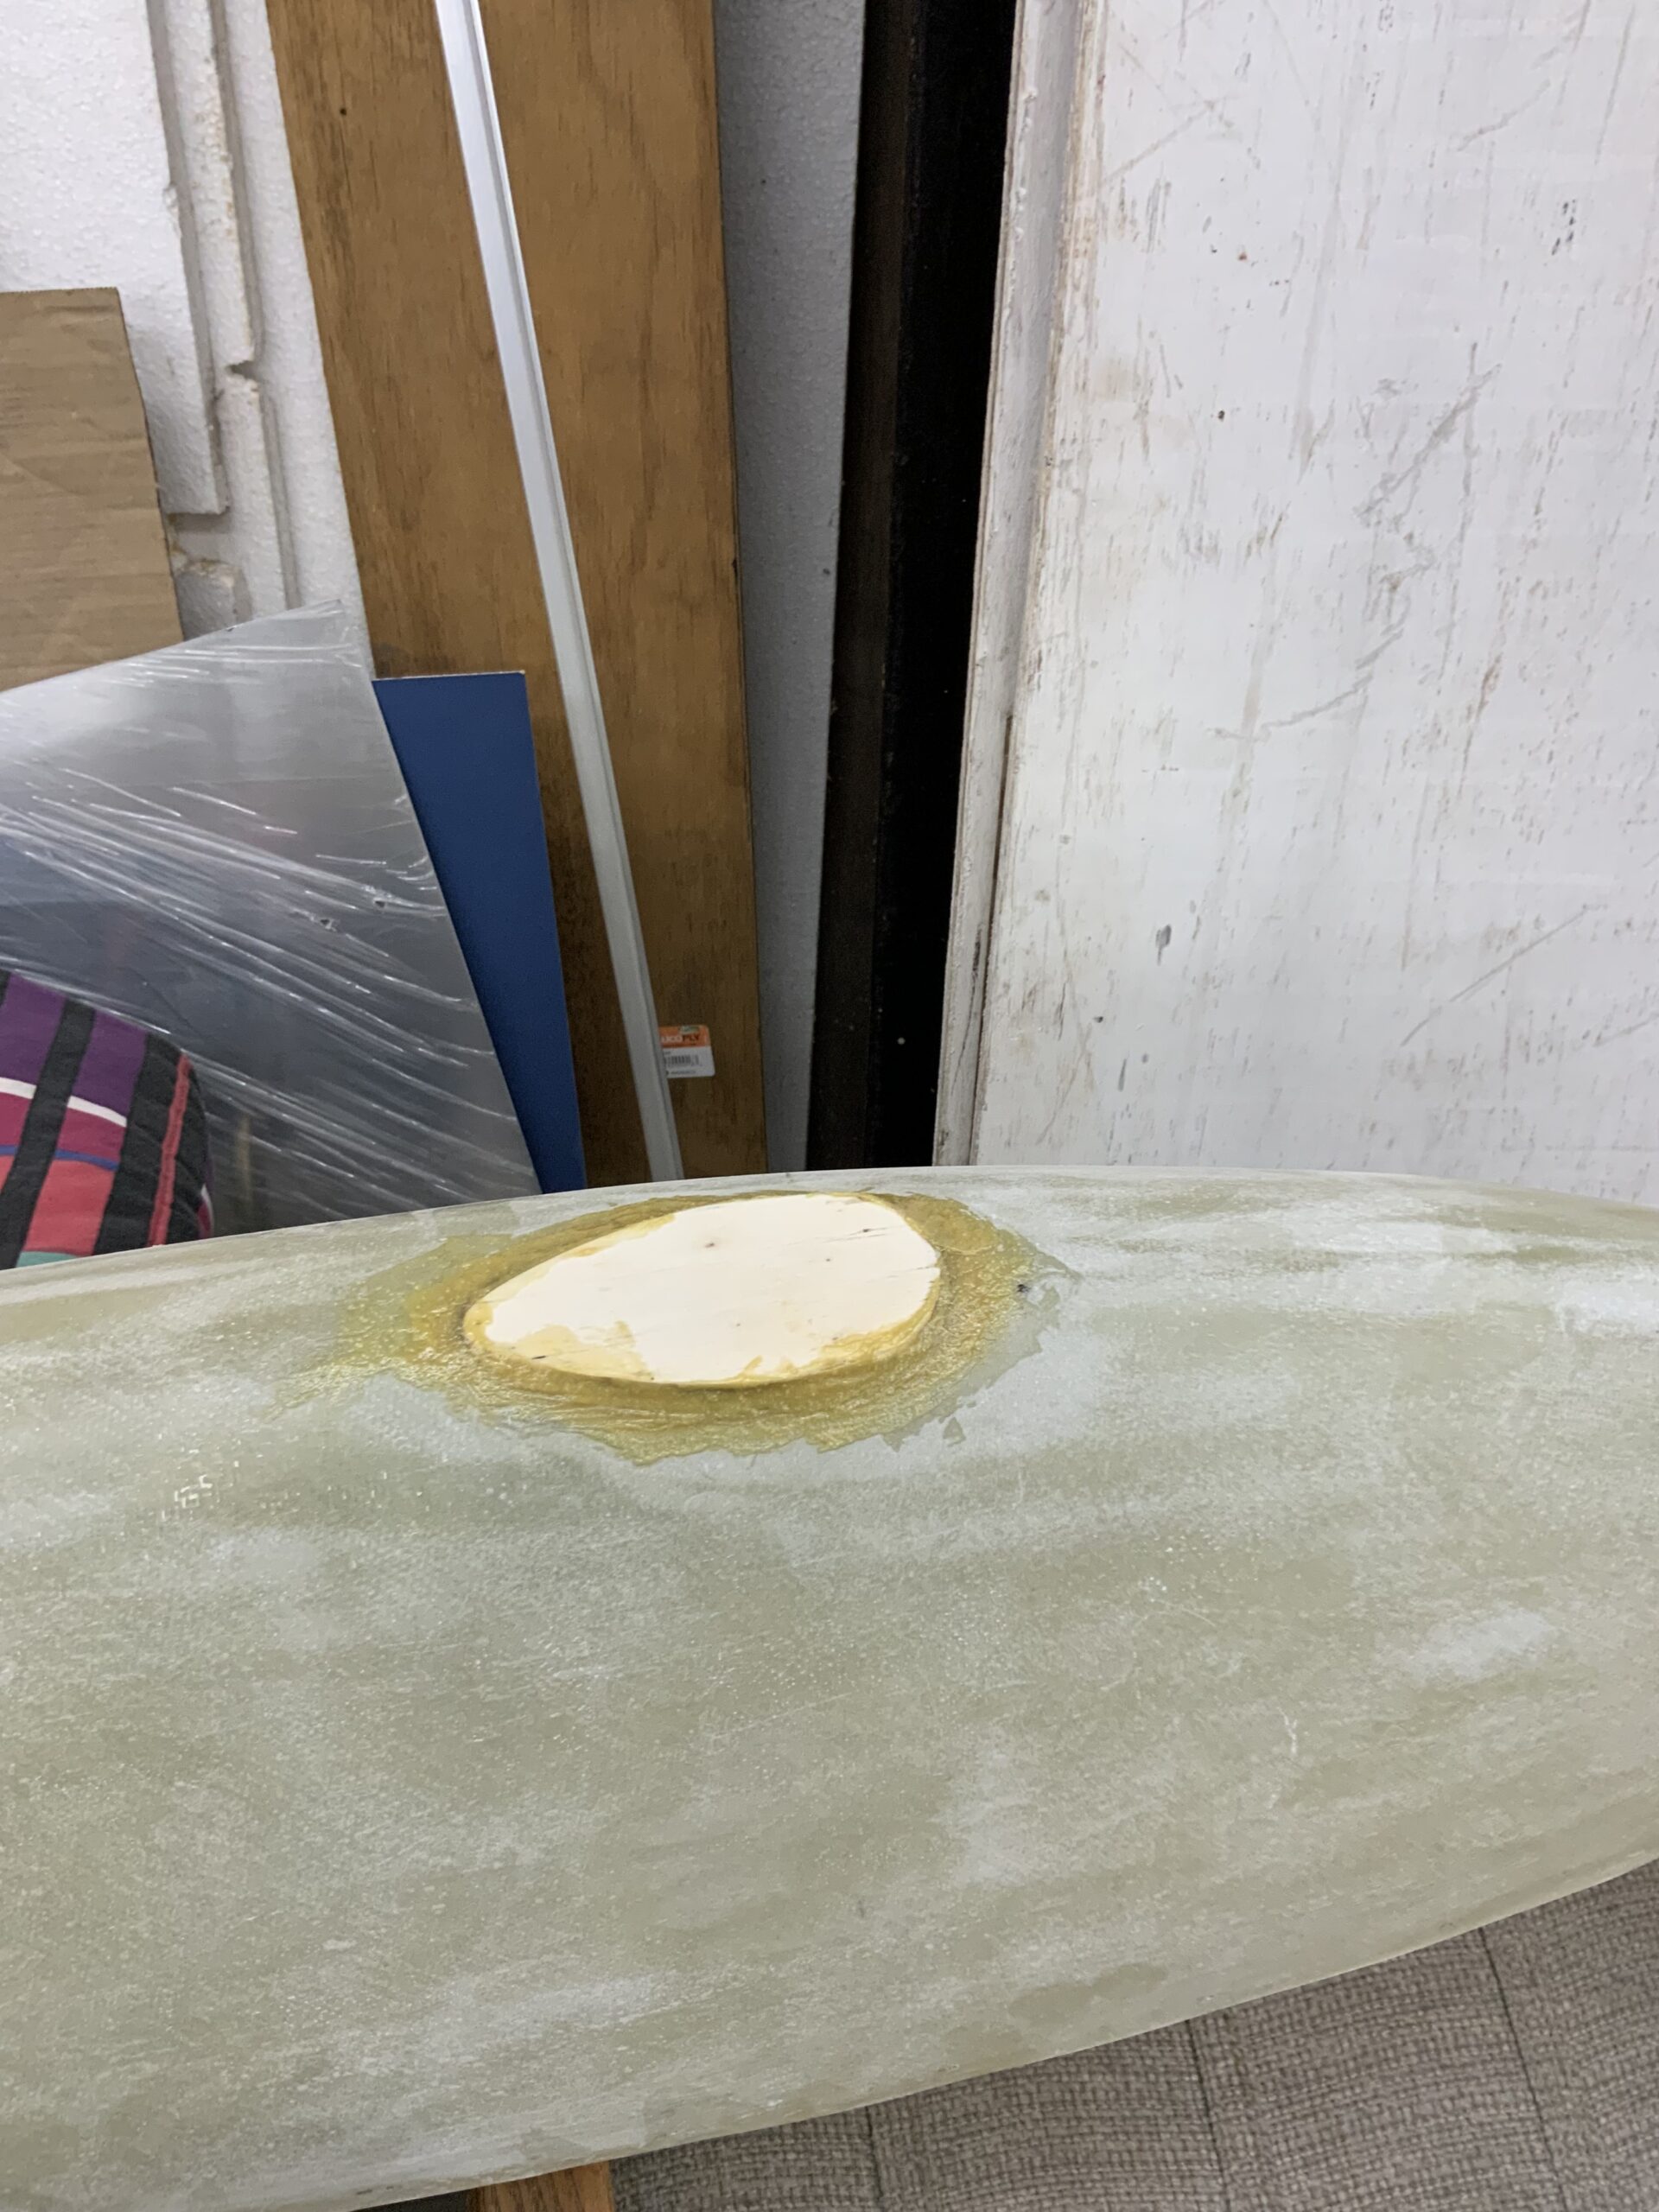
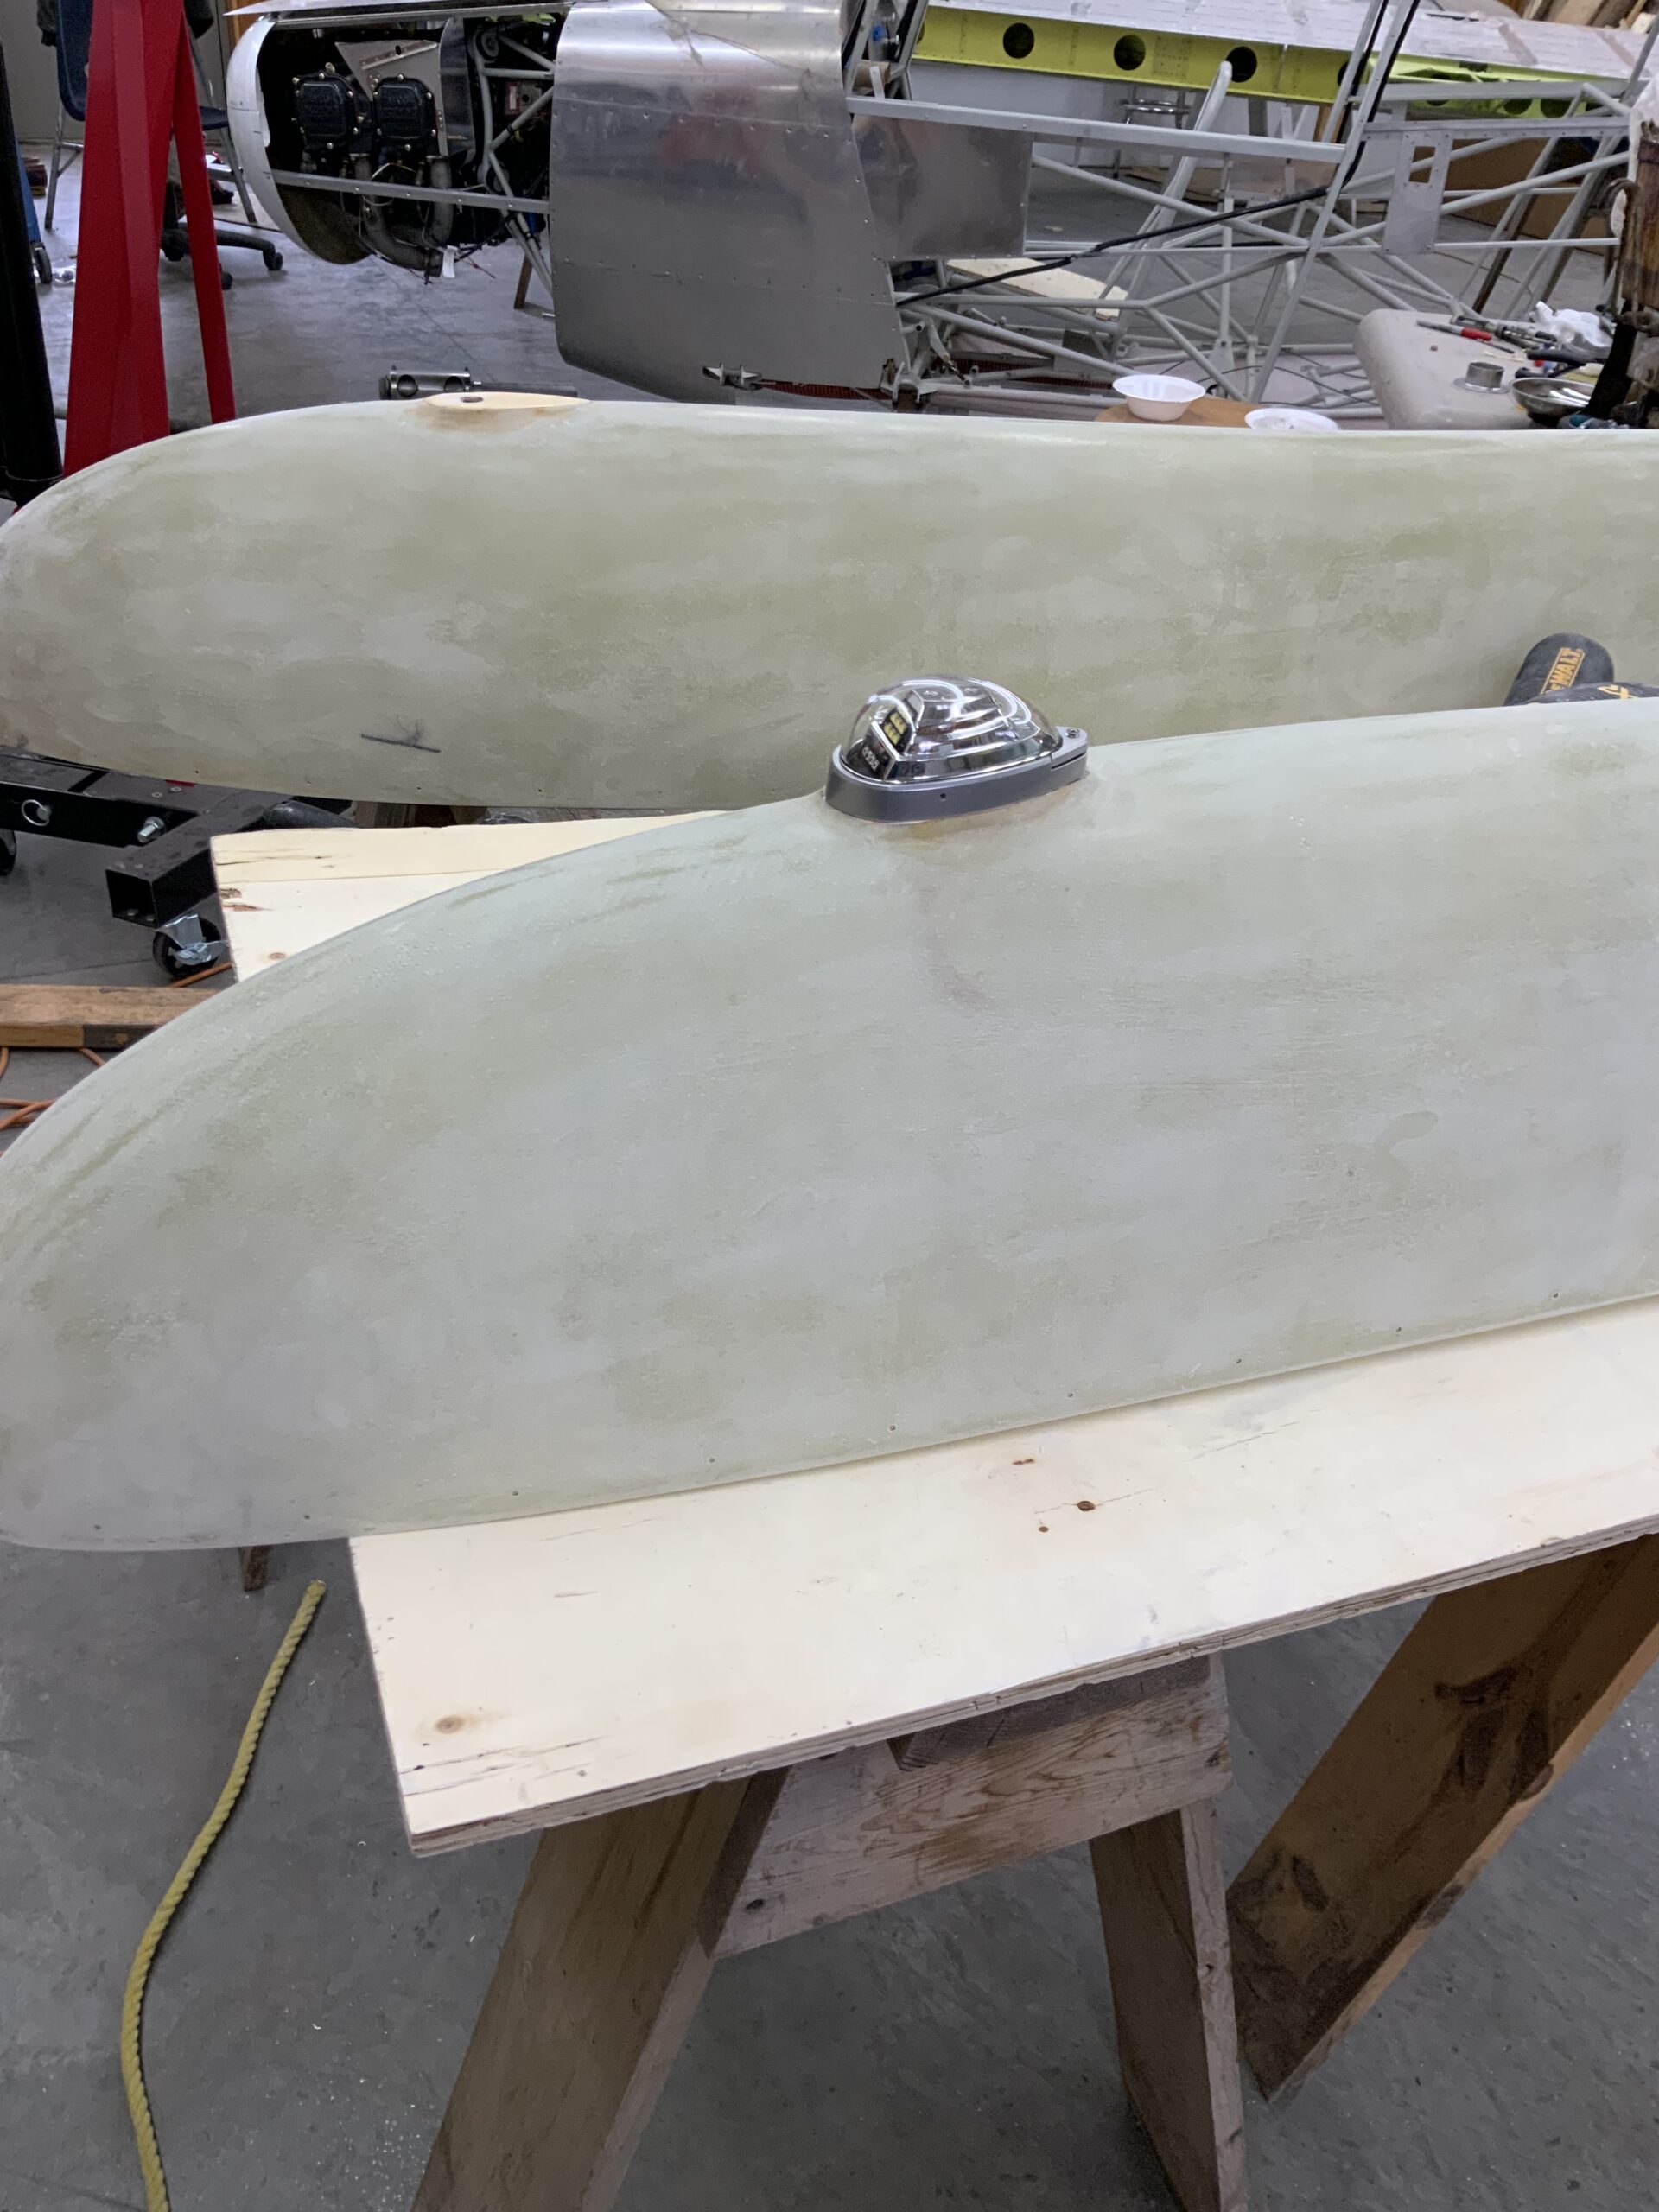
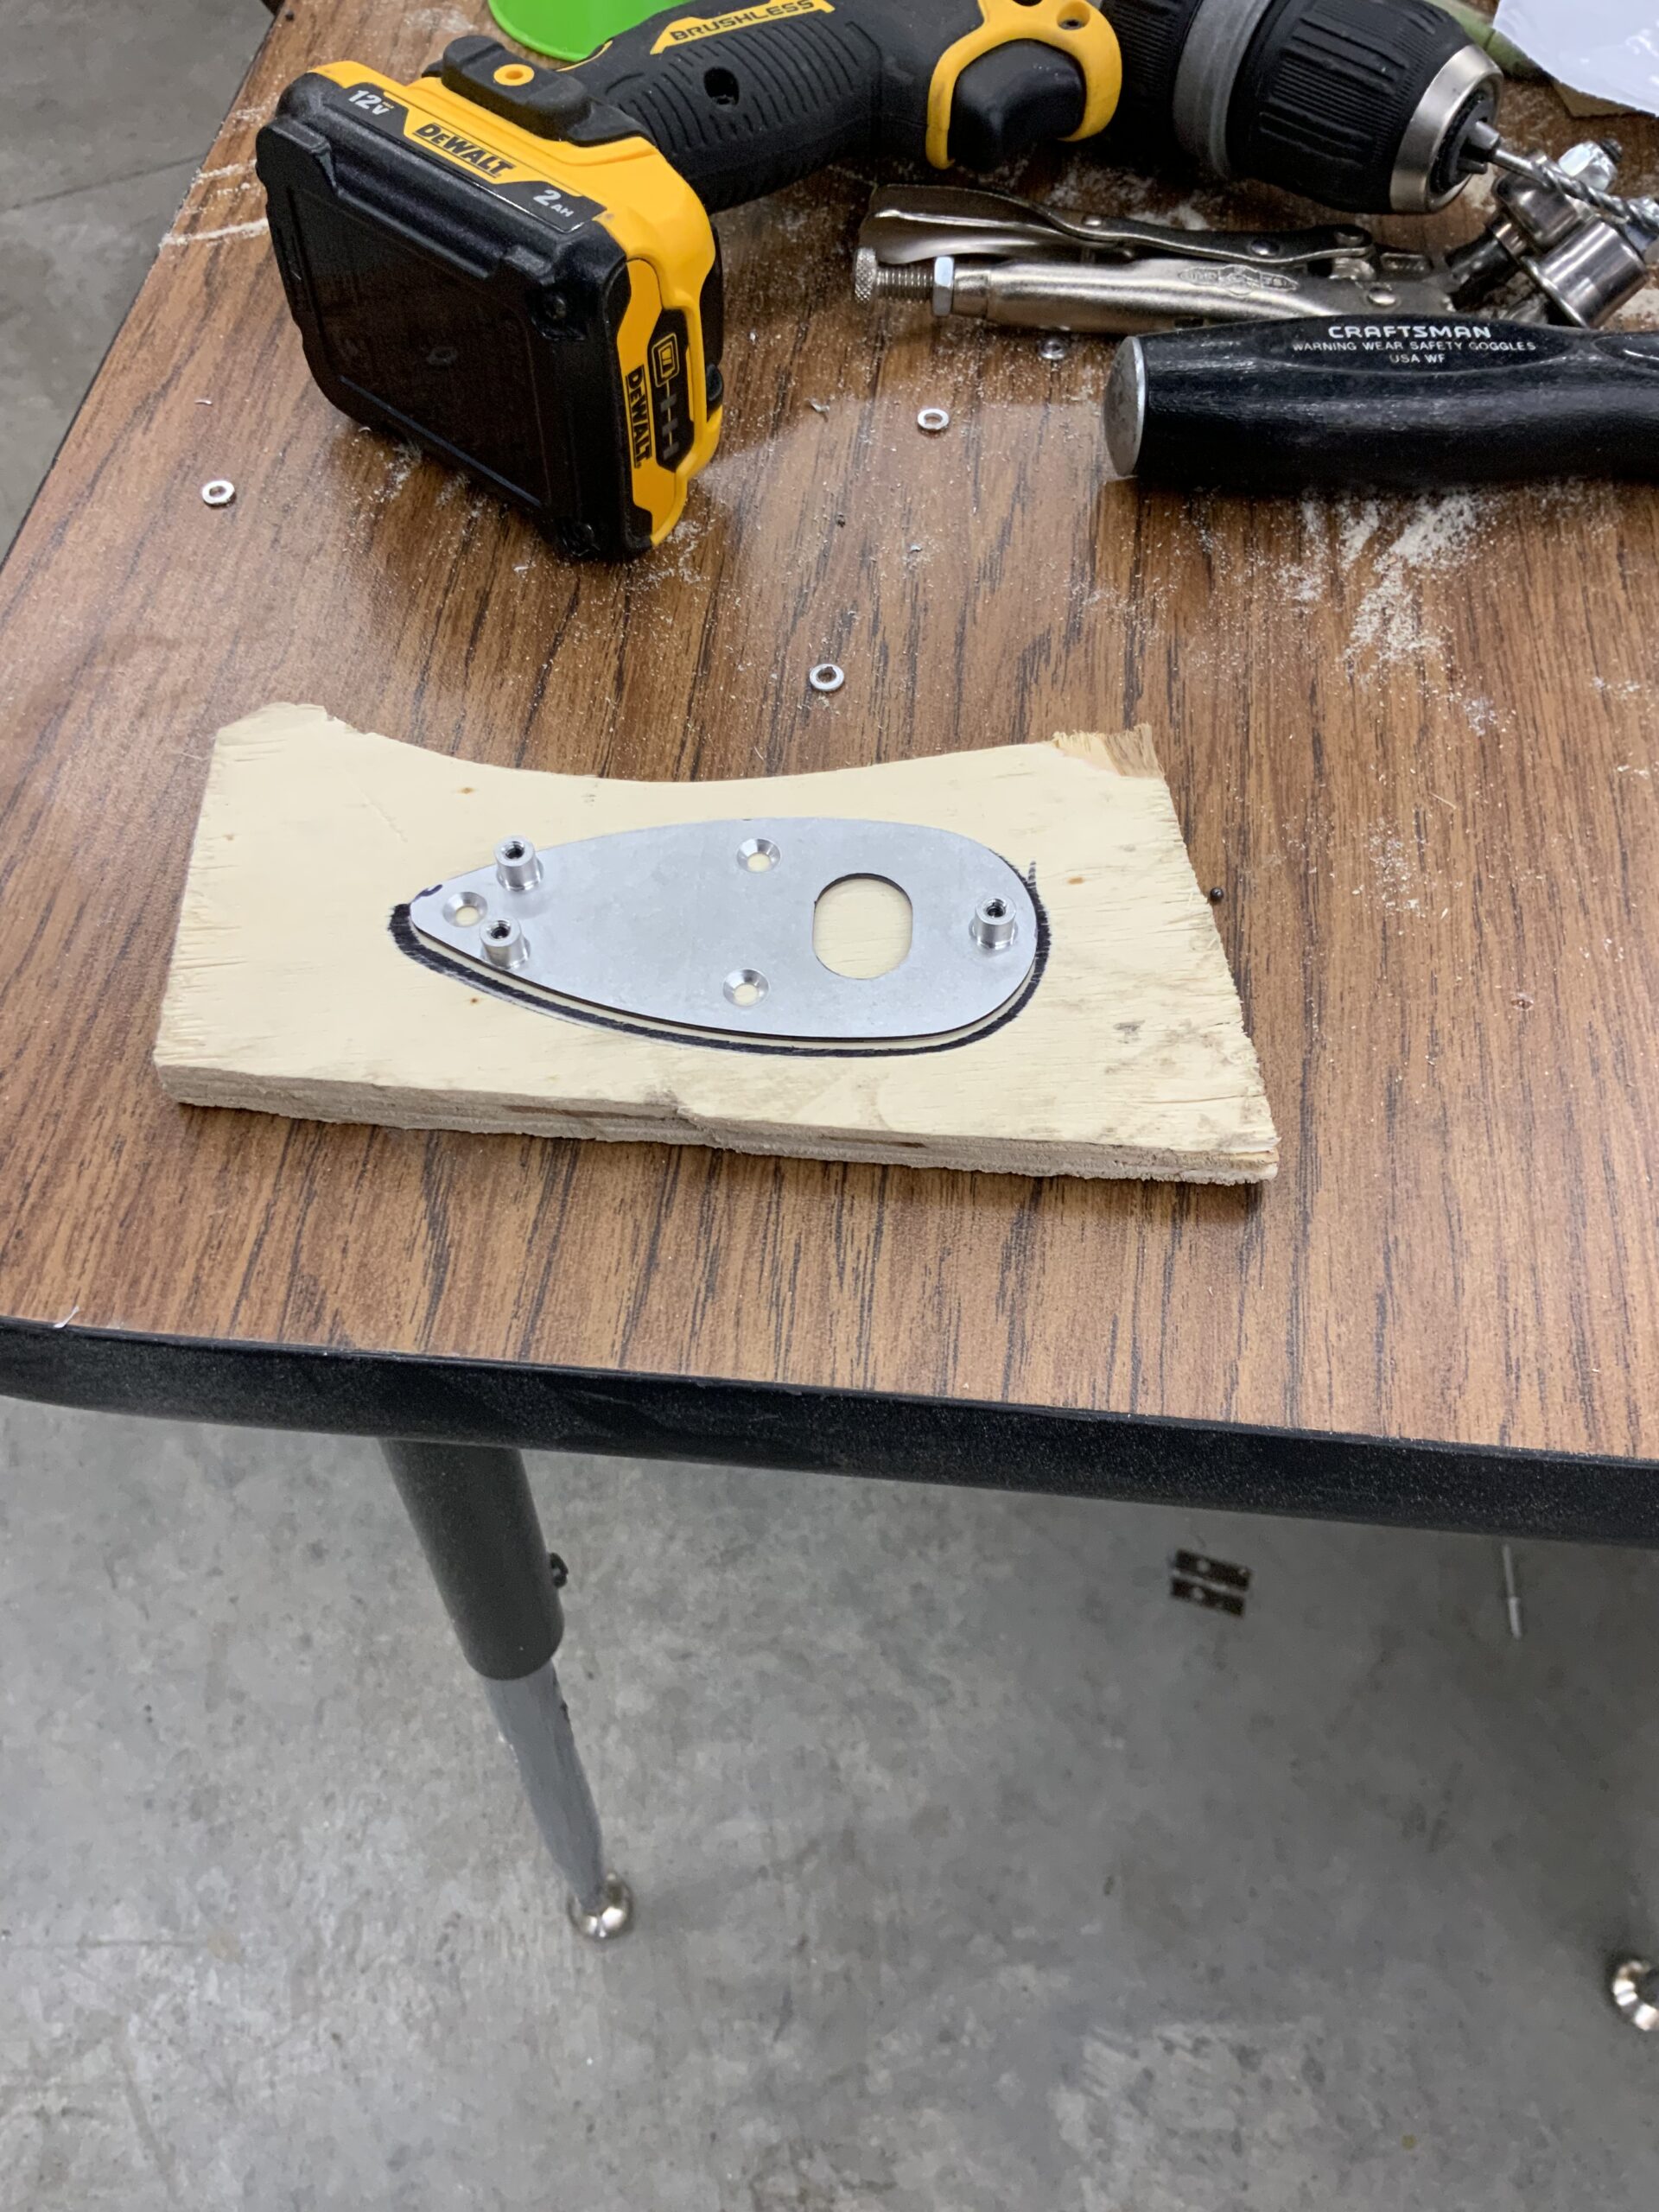
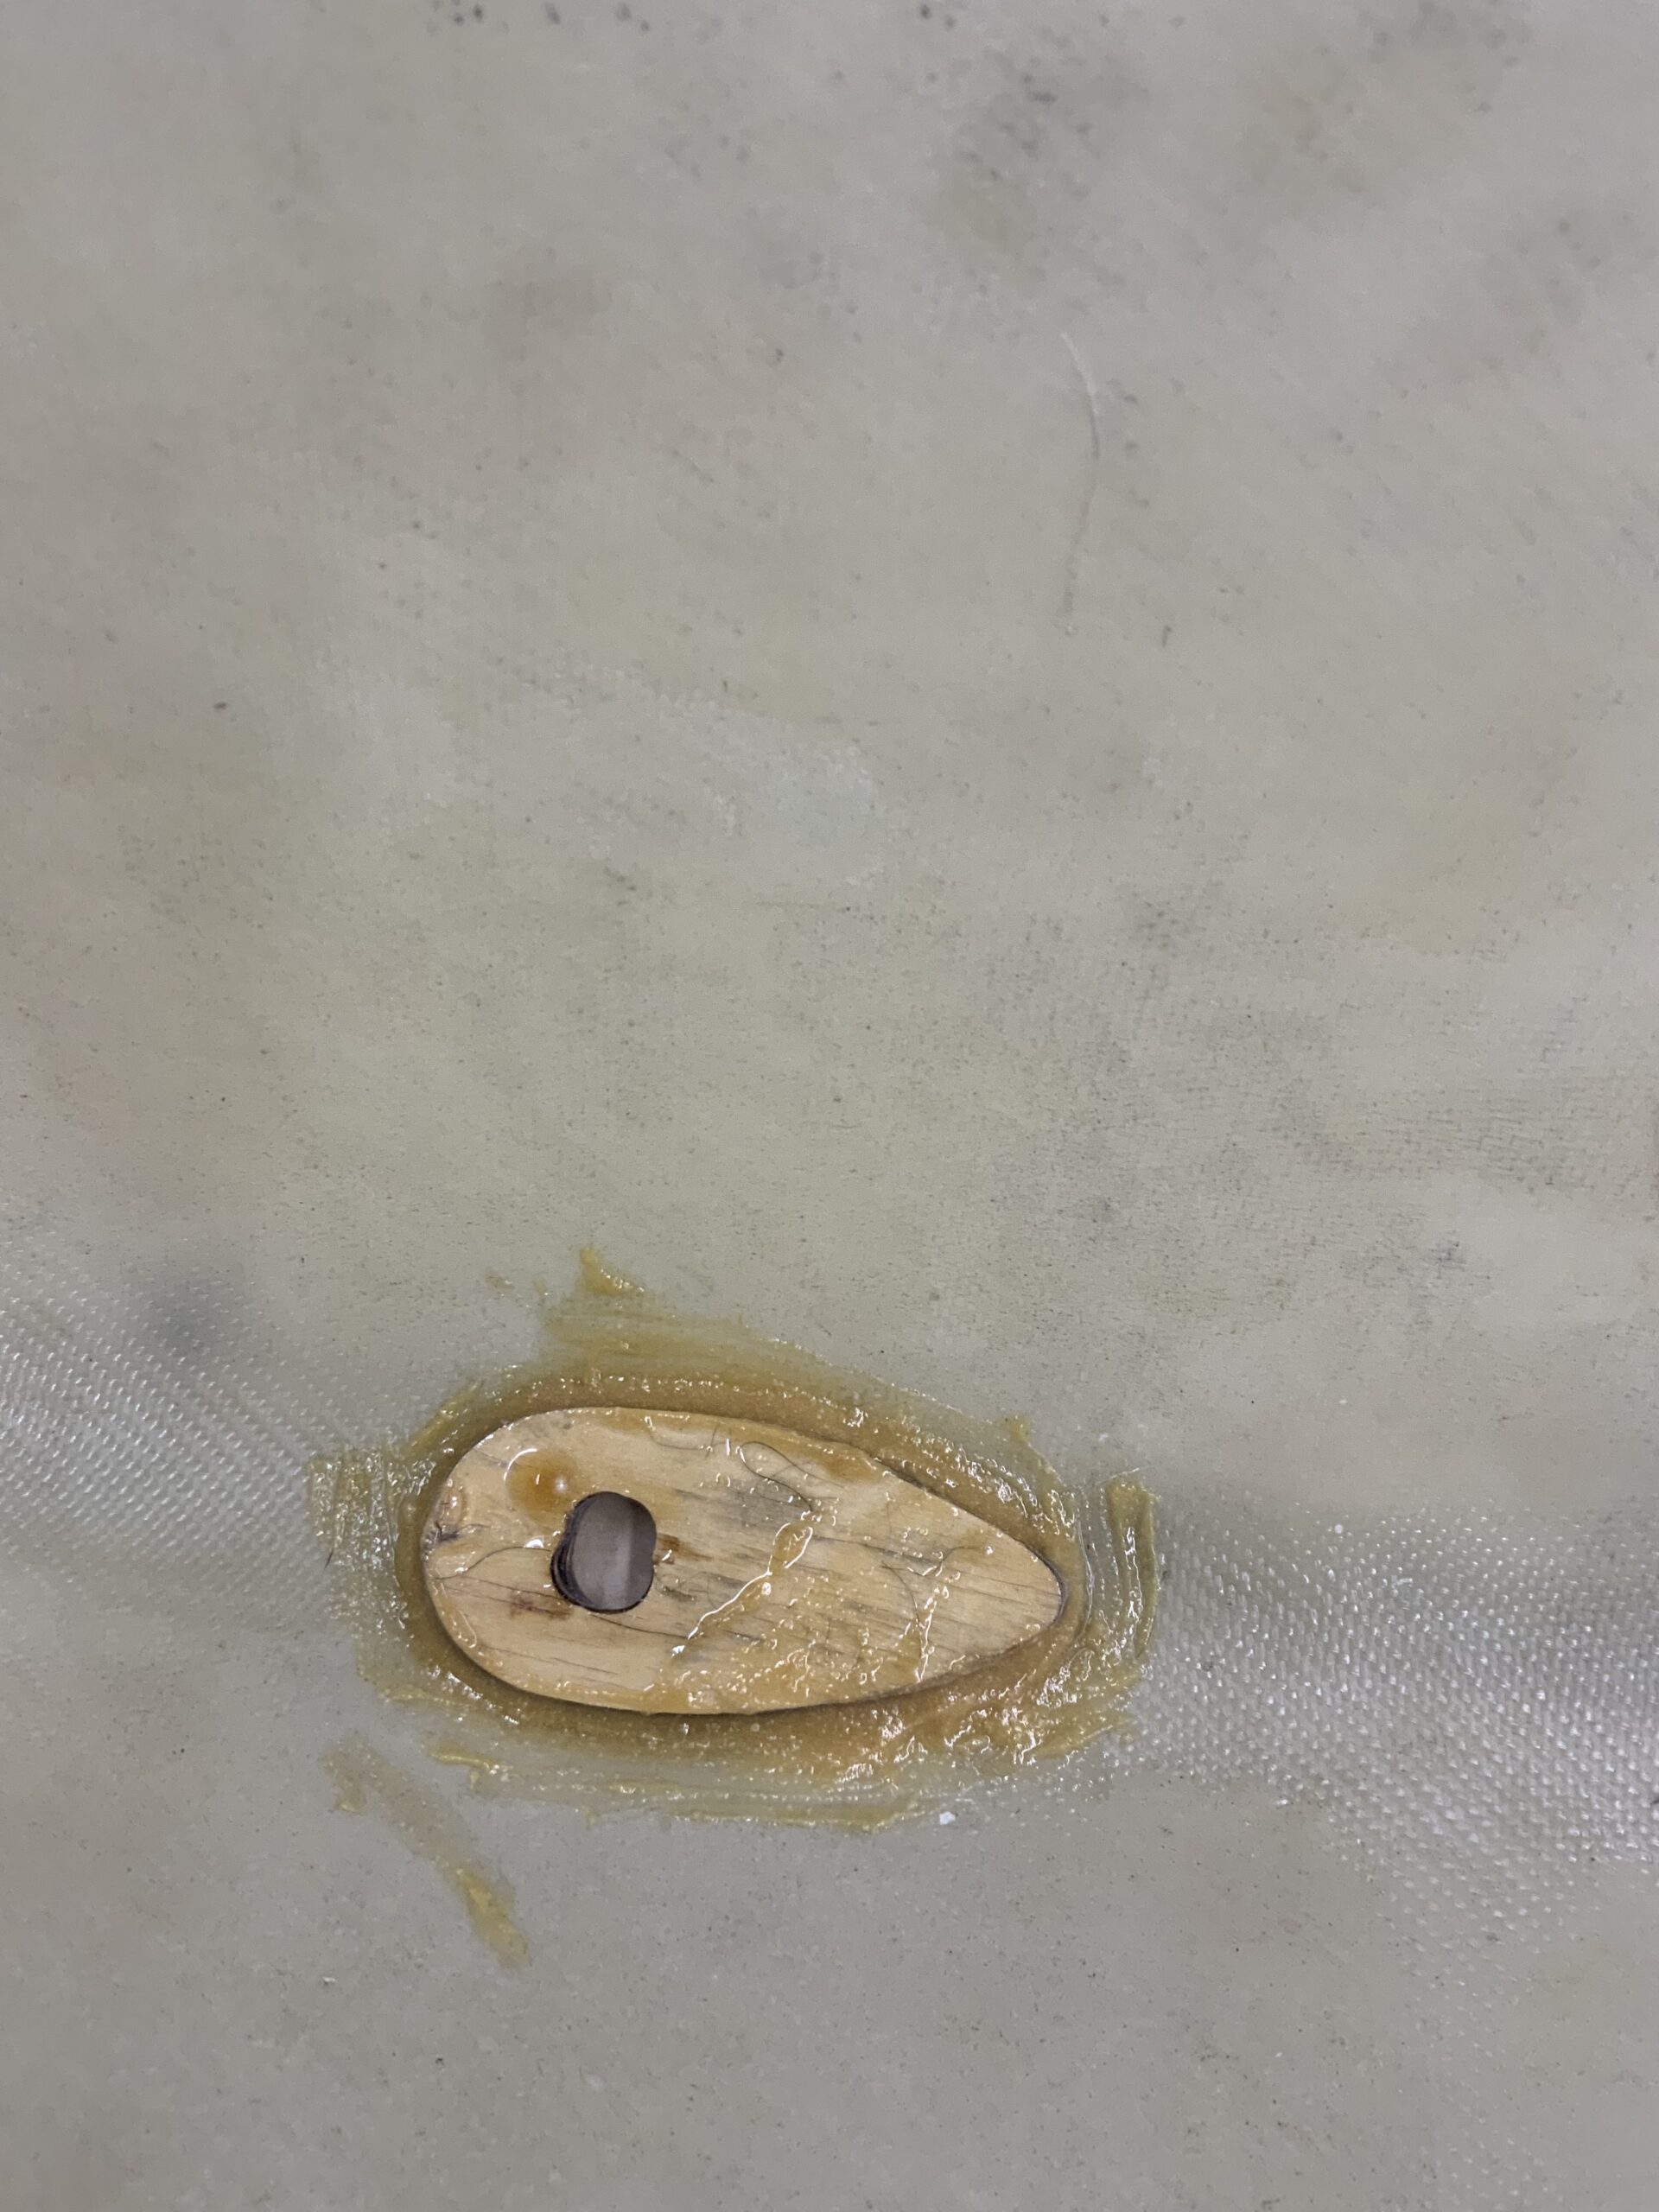
Making Fiberglass Wingtip Strobe Mounts
Source: 2025 Q4 Beartracks, Mark Richardson
As many of you know I have been scratch building a Bearhawk 4A for the last 126 years (at least it seems that way). As of this writing (November 2025), the airplane is done and is awaiting decent enough weather to do it’s first flight. Unlikely in November and December, but hope springs eternal…
What I wanted to talk about in this article is how I went about making the mounts for my Nav/Strobe/Position lights on my fiberglass wingtips. When I said I scratch built my aircraft, I REALLY meant I scratch built about 98% of it. I was lazy and bought some parts already made including the wingtips. Although I could have made them myself, I come from the Van’s RV world and avoid plastic airplanes and their associated parts like the plague. That being said, the tips are quite nice, but lacked any provision for tip lights. Time to man up and make something out of …. ugh … fiberglass.
I started with a piece of 80 grit sandpaper taped to the wingtip where I was going to put the light mount. I took an appropriately sized block of pink EPS (Extruded PolyStyrene insulation) and rubbed it over the sandpaper to get the correct contour of the wingtip.

I then got it down to a reasonable thickness and traced the outline of the light itself (using the rubber base seal) onto the styrofoam. Then, using a drywall rasp, sandpaper, etc, I made a aerodynamic plug for the mount itself.

The next trick was to form a rigid fiberglass shell over the form that matched the contour of the wing. I started by putting a layer of packing tape on the tip where the mount was going (to prevent the resin from sticking to the tip). I used double sided tape to position the styrofoam plug in the right spot.

Now I needed to get the rough styrofoam smooth enough for the fiberglass and then make it non-stick. I did this with Bondo first, sanded smooth, then applied a thick layer of paste wax.

I applied four or five layers of fiberglass cloth using West Systems epoxy, and then while it was still wet applied some bits of “Peel Ply” (which is really just Ceconite covering material) to soak up extra resin and make for a fairly smooth surface that will require less sanding and filling.

Once it had hardened up, I popped the whole thing off (thanks to that packing tape).

Then I just used scissors, a Dremel, etc to trim the mount to shape and remove the styrofoam on the inside. I again used the light’s rubber base seal as a pattern to make an aluminum plate to fit inside the mount and act as a place for the nutplate attachment.

Now I needed to actually mount it on the wingtip. I created an opening for the wires to pass through, removed the packing tape from the outside, and used epoxy to glue the mounts on (clecoes held it all together while the epoxy hardened).

Now came the tedious part. I used several more layers of 0.6oz fiberglass cloth (super light) to ensure everything was well attached to the tip. After that came many, many iterations of resin with microballoons, sand, repeat, until I was happy with the blending. The final coat before priming and paint was actually a thin layer of Bondo.

In the end it turned out really well. You cannot see that the mount wasn’t part of the wingtip originally which is exactly what I was shooting for. I can’t imagine making an entire airplane out of this stuff but it sure is handy for making smaller parts.
Kit Wingtips
Working with molded, open sided fiberglass parts, like wing tips and nosebowls, is a little frustrating: they are never exactly the same because they move a little while they cure. This is especially when they are as lightweight as airplane parts. So, you may have to do a little creative messing around to get the tips to fit the way you want. Or they may be perfect and will slip right into place.
Lap the fiberglass over the outboard rib, and attach them with screws and tinnerman nuts or nut plates and machine screws. Bob has been known to pop-rivet them in place, but we don’t recommend this because of the great maintenance utility of removing the tips during condition inspections.
The best, although most laborious, approach to this is to install nut plates. Then use #6 countersunk machine screws. Use countersunk washers under them to protect the fiberglass. Space the screws frequently enough to prevent the tips from scalloping. This will probably be something like on every third rivet. Use a marker to label each rivet that will be removed, then drill out the rivets. Enlarge the holes to match the pilot pin on your nutplate gauge, then install nutplates at each hole. Don’t be concerned about losing strength by removing rivets; each hole is going to get two more rivets when you install the nutplates.
Position (Nav) Lights
The tips in the kit have no provisions for either navigation lights or landing lights. Builders who want navigation lights will need to create a platform on the tip to mount the light/strobe unit. This usually entails making a 1/4” plywood base the shape of the light to be used. It is bonded and screwed in place, then faired in with the lightest material available, which is usually balsa or foam covered with a layer of epoxy/microbaloons or Polyfil. Don’t use automotive body filler like Bondo because it is really heavy. Most builders use a combination position light unit that includes the aft-facing white light in the tips, which saves the trouble of routing a wire back to the tail and creating a light mount on the rudder.

This builder epoxied and fiberglassed a plywood mount in place and faired it in with foam and microballoons.

Landing Lights
If you don’t want to put the lights in the nosebowl, the wing tips are a good place for them, although several builders have cut their leading edges for them. Install between ribs #11 and#12 using a one piece, .032 doubler that looks similar to the frames used for mounting the inspection panels.
It should be 1 1/2” wide, all the way around the light cutout and attached with MS20426AD3-3 rivets on approximately 1” centers. Be aware that cutting the leading edge is not to be taken lightly since it has a large impact on the strength of the wing, especially as you move inboard from the tip. Putting the lights in the tips involves fabricating a lens, though there is at least one report of successfully modifying an RV-10 lens.
Wing Parts Aft of the Rear Spar
Wing Template Use
You received a plywood wing template that is cut in the outline of the upper surface of the wing. This is your guide for establishing the correct profile for everything that will be attached to the rear of the wing. This includes flaps, ailerons and, in this case, the root and tip ribs. If you utilize the template for alignment, you’ll find everything is nicely lined up and the airfoil is accurate.
Root Ribs
Attaching the root ribs is quite straight forward, although there are several possible peculiarities
depending on when your kit was produced. The shortening of the bottom stiffener has been mentioned, but we’ll discuss it again in relation to the root rib. Briefly, in a few airplanes, the bottom flap bay stiffener is 3/4” too long and must be shortened to allow attaching the root ribs. Use the wing template to align the root rib and clamp it against the vertical stiffener in each of the root rib positions. Drill four #40 holes through the rib and the angle that’s riveted to the rear spar. Before drilling, make absolutely the rib is flush against the wing template.
Cleco both ribs to the spar attach angle and slide the pre-bent aluminum skin over the ribs and under the skin and above the flange. Notice on Drawing 2 that the rivets between the two root ribs going through the skins and the spar are AN426-4’s, NOT AN3’s.
On some older kits, if the supplied metal is flushed to the fuselage-side of the root ribs, it hangs into the flap bay by about 1/4” and partially covers one of the holes in the lower rear wing skin. If this happens, slide the sheet metal toward the middle of the airplane enough that it is flush with the flanges of the root rib in the flap bay and clamp it in place in preparation for drilling the rivet holes. Use a rivet spacing fan to layout an even row of rivet holes. After they have been drilled, remove the ribs and the trailing edge skins and debur and dimple all holes.
Trailing Edge Tip Rib
Because it is rather fragile, you can hold off installing the outboard, trailing edge rib until much later, when you’ve riveted down the top skin of the wings and are ready to install the wing tips. The wing tips will protect the trailing edge rib. An alternative is to install it temporarily by clecoing the wing skin down and drilling all of the tip attach holes in the ribs, skin and tip, so the wing tip protects the rib. Then remove it until ready to close up the wing. Regardless of which direction you go, install the tip rib the same way you did the root ribs: use the wing template to guarantee proper alignment and fit the fiberglass wing tip to the tip ribs, not the other way around.
The supplied plywood template is the key to establishing the vertical placement of both the ailerons and the flaps.

Left wing root. Notice how the bottom skin stiffener abuts the flange. You’ll use the plywood template for aligning the ribs.

Handling Fiberglass – General Introduction
Fiberglass parts on your airplane will include the nose bowl, wing tips, and several fairings. Parts provided with your kit are made to provide many years of reliable service. The parts have been provided as they came out of the mold. As you fit them to your airplane, plan on using threaded fasteners as opposed to rivets. If you must use rivets, it is best to sandwich the composite between two layers of aluminum. Rivets placed directly into the fiberglass will work loose in a short time. Fill any imperfections in the surface with a lightweight and durable filler, such as Polyfiber’s Superfil. Automotive products like Bondo are too heavy, and may shrink. Parts that are not covered with a white gelcoat will have tiny pinholes that will require a squeegee action with the filler compound. When you think you have them all filled, a coat of primer will show for sure.
If you should need to make repairs, be advised that the 4-Place Nosebowl and the pre B-Model 4-Place Wingtips are made with Vinyl Ester resin. The remaining parts are made with epoxy resin.
Bob’s Carbon Fiber Prop and Carbon Fiber Wingtips
Source: 2016 Q4 Beartracks
Lots of exciting things are happening at Bob’s shop. Specifically, things are getting lighter, thanks to more use of carbon fiber.

He has expanded testing on the carbon fiber propellers that he has been making. Readers may remember reports in the last year of Bob testing lots of different props. He found the best performance from the aluminum McCauley prop, which weighs around 22 pounds. Knowing that he could do better with carbon fiber, he developed a process to lay up a carbon prop by hand. The process involves a mold for the front of the prop, and a mold for the back of the prop. He and his composite expert Lauren take turns laying up plies of carbon fiber cloth, around 8 layers at the tip, and perhaps as many as 90 at the hub. They alternate layers and each work on both sides of the prop to help ensure that minor variations in individual technique doesn’t impact the balance of the prop. Once those two layups are done but before they are cured, the two halves are joined for the final cure. The finished product is mostly hollow, except for the last few inches of the blade. As one might expect, the prop requires a fair amount of finish work once it comes out of the mold. Bob has developed a leading edge treatment that is a stainless steel powder mixed with resin, which yields an abrasion-resistant coating that is easily field repaired with a product like JB Weld.
The first prototype has over 200 hours of operation on his Bearhawk LSA, spanning almost two years. The second prop has around 30 hours, and he has a third that is ready to begin testing. He plans to offer the props for sale on a very limited basis, such as 3-4 props per year. The construction process is labor-intensive, and he plans to test/prove each prop with at least 10 hours of operation on his own airplane before shipping. The cost will be necessarily high (expected to be around $1800 per prop) but the total weight is a mere 8 pounds, and the performance is as good as the metal McCauley that he likes. Perfor-mance will be great on any airplane in the 100hp/100mph class, but the prop is specially designed for the Bearhawk LSA. He also plans to develop a similar prop for the 180hp Patrol and 4-Place in the com-ing years, which will weigh less than 15 pounds.
R&B has also expanded to offering carbon fiber wingtips. These wingtips cost a little more than the fiber-glass, but the weight savings is around 1 pound per wingtip. As Bob says, “Sometimes pounds are hard to find.” These tips are made in a female mold, laid up by hand by Lauren, who is also female. The virtue of these and other composite parts from R&B is that they are made with just the right amount of resin. Less experienced builders may have trouble by adding too much resin, increasing weight, or too little, reducing strength. The extra cost is $50 for the LSA and $55 for the Patrol/Model B.
Many builders are interested in the Model B plans for the 4-place. Bob has been working hard on the drawings and a “good share” of them are finished. He hasn’t set a firm deadline, but doesn’t plan to have them available to ship for at least four weeks.
Bob would like to plan a long trip to Idaho in mid-June 2017. He’d plan on spending 3-4 days to get out there, 3-4 days to get back, and 4-6 days of flying around the backcountry. If you’re interested in joining him, please get in touch by phone at 540-473-3661.
Forming a Landing Light Lens in the Wingtip
Source: 2016 Q2 Beartracks, Mike Swain
Disclaimer: Making these lenses brought me to an emotional low in my build. I really struggled to get a lens I was happy with and I was tempted to give up. I know ya’ll like a challenge, so here is how I did it.
First, I needed the shape of the lens. To know how big I wanted, I made some cutouts of poster board to represent the size of my landing light and nav/strobe. I used these to determine how far back to go so I would end up with enough mounting area for the lights. Once I had this I drew the cut lines on the wingtip. Keep in mind your position lights (red & green) are supposed to be visible 110 degrees.

Once I had the wingtip marked up with a fine sharpie (photo above), I used a Dremel cutoff wheel to carefully cut the lines, but I left small uncut areas in the corners so the piece we want to remove stays securely in place for the next step, which is making the lens mounting flanges. I’ll be saving this cutout piece to build the form for the lens.
I marked parallel lines to the cut lines on the inside of the wingtip, 3/4″ inside and 1.25″ outside. The idea is to have 1/2″ flanges after trimming and the 1.25 overlap outside gives good bonding area to the inside of the wingtip. I cleaned the area inside the cut lines with air then wiped with solvent to clean any dust from cutting. Next I used clear packing tape to cover the entire area inside the cut lines, this will prevent the fiberglass from bonding to the piece inside the cut lines (photo below).

I now cut some fiberglass cloth so it would span the lines marked previously. It should protrude about 3/4 inch into the area where the lens will be and 1.25 outside the line where it will bond to the wingtip. I ended up using 4 pieces to go all the way around, I found it easier to work with multiple pieces. Once I had the glass cloth shapes cut, I made 6 more of each shape for a total of 7 layers. I scuffed up the area outside the cut line where there is no tape (careful not to move or mess up the tape) then cleaned with some alcohol. For the flanges, I wet out the cloth on a piece of parchment paper then put it in place, lining it up with the lines previously marked.

Once your flanges have cured, you can carefully cut the rest of the lens area out. Be careful not to cut beyond the thickness of the wingtip, you don’t want to get into your new flanges. Once you’ve removed the material you should be able to work the piece free since the cloth will not bond to the packing tape underneath. Be careful not to damage the cutout, as it will be the form for your lens. Now you can trim the flanges back to .5 inches.
You’ve now got a wingtip with a big hole.

You now need to form the 4 “walls” that provide mounting surface for the lights and finish out the space. I used heavy card stock, tape, and trial and error till I got the walls laid out. I stole some of my kids play-dough and used it as a form to transfer some of the complex curves onto the cardstock where the walls meet the wingtip. I then covered the cardstock in clear packaging tape so the wall layup will not bond. I taped the 4 cardstock pieces carefully in place from the outside, these will now be the forms for the fiberglass.

I used some thickened epoxy (left) to create filets all around the interior of the wingtip along the backside of the cardstock where it meets the wingtip. This is so the fiberglass does not make sharp 90 degree bend. I then put 5 layers of cloth with about a 1″ overlap to get a good bond. Once the layup is dry, you should be able to easily remove the card stock (below).

I used 1/16″ mirror Plexiglas to cover the walls, so I simply lightly sanded the walls after I removed the cardstock. If you plan to paint, you might need to spend some more time and filler to get a nice smooth surface.
Forming the Lens
I thermoformed my lens from .093 Lexan (Polycarbonate) using my shop vac as a source for vacuum, so first step was to build a vacuum box. I used some 3/4 MDF I had laying around and built a box 14″x22″x3″. Why that size? From what I could gather online, you want roughly 30% more material than your form to allow for stretching, etc. It was an educated guess. It turned out well to have the top frame fit in the oven well (more later). I cut a piece of pegboard to fit inside. I then glued and brad nailed some pieces of wood around the inside of the box so the pegboard would sit flush with the top. I also glued a couple piece of wood to support the pegboard in the center. Cut a whole in the middle of the box to fit your vacuum hose. Now line the top perimeter of the box with weather stripping to provide a good seal.
You need some sort of frame to hold the Lexan. I used some 1×2 pieces cut to the same size as my box. I used my Kreg jig to make a quick square frame. I then cut 4 identical pieces and match drilled .25 holes towards the outside of the frame, 2 on each side to be used and secured with screws and wingnuts. It was a pretty crude frame and you might do better, the idea is to be able to hold the piece of Lexan securely and form and maintain an air tight seal against the vacuum box. Mine was essentially a clamp between 2 pieces of wood. I lined the portion of the frame where the Lexan sits with some thin .0625 weather stripping.

The cutout from the wingtip will be the form for the lens. This need to be reinforced since you will be pulling a good vacuum down over top of it, you want it to maintain it’s shape and it needs to be elevated slightly when it sits on your vacuum box. This is due to the Lexan being in a frame and not necessarily flush to the vacuum box. I used my card stock to mock up templates for some wooden supports I cut from scrap lumber which I epoxied into the cutout (clay version, shown right). It sits on the box open side down with what is the edge of the wingtip pointing straight up.
Once you have reinforced the form, you want to make sure the surface is perfect. Any imperfection will show in the lens. Use filler and sand if needed.
When you are ready to form, the first step is to “dry” the Lexan. Load a piece of Lexan in your frame and put it in the oven at 180 for 5+ hours. You can get steam bubbles if you skip this drying step. My frame was a perfect width where it would rest on the same supports used for holding the oven racks. Otherwise you will need to support the frame somehow in the middle of the oven. You don’t want anything below as the Lexan will sag when you raise it to forming temperature.
Make sure everything is in place before starting the forming step, because it happens fast. Vacuum box, vacuum on, helper, gloves to handle the hot frame, etc. I coated my form in petroleum jelly, I read somewhere it helps. When I was ready to form, I removed the frame and Lexan and bumped the oven temp up to 350. Once it reached 350, I put the frame back in. You have to keep a close eye on things because you are watching the sag of the Lexan as the indicator of temp. I found that once the middle of the Lexan was about 2.5″ below the frame it was ready. I had my vacuum box on the floor next to the oven. Open the door, pull out the frame and immediately push evenly down over your form. You have to eyeball things a bit, but your frame needs to come down and land on the weatherstripping around the perimeter of the forming box to make a good seal. Once the seal is made the Lexan will draw down. Rather than pulling a hard vacuum, I found that I got a better part by pulling the vacuum hose out of the hole as soon as the Lexan forms around the part and holding it close to the hole, acting like a partial vacuum, otherwise the Lexan would wrap around the under side of the part which makes it hard to get out. You have to be very quick as it happens very fast. It might be better to have a helper. Another approach would be to build a solid support for the part so the Lexan cant pull under. Pop the form out as soon as it cools enough to handle but hasn’t fully hardened. It’s easier when it’s still hot but solid.
Here is a video of the actual forming.
If you get the Lexan too hot, it tends to “print” easier, and it looks wavy and shows imperfections in the form easier. I found there is a very small sweet spot at 2.5″ inches of sag. Too cold or too slow from oven to form and it will be too stiff to properly form. Also, I had better results with the polycarbonate I ordered from Amazon, which turned out to be Bayer Makralon. The brand from Home Depot and Lowes I did not have much luck with. I also tried Plexiglas but found that it was very brittle and would crack easy when I tried to trim it. Keep in mind it smells up the house pretty good too, not to mention using the food oven for heating plastic may not be the best idea. My kitchen closes off from the rest of the house and I opened a window with a fan blowing out.
I pulled the formed part out of the frame and rough cut the excess material. Then I carefully marked the rough trim line by placing the lens in place. I then carefully final trimmed with my pneumatic 1/2″x24″ mini belt sander and a lot of trial fitting. I radiused the inside corners and sanded the edge with 220 grit when I was happy with the fit.
My lens shrunk slightly, so I ended up using some quick fair compound in the flange to get a perfect looking fit. Also, where I radiused the corners of my lens the cut in the wingtips are square, again I used some putty to make everything perfect.
Once you’re happy with the fit, you can drill the lens to the flange. I drilled and clecoed #40 first, then went back and opened them up for #6 screws and riveted on plate nuts using soft flush rivets. I originally planned to use countersunk screws, but I didn’t have good edge distance on a couple of holes and I read Lexan can crack if countersunk screws are used. I settled on some low head (.063) socket head screws (Mcmaster Carr P/N 90666A002). You can now mount your lights and add any trim. I trimmed the interior area where the lights mount in .0625 mirrored Plexiglas. I used adhesive caulk to hold it on. It was a long process but it was fun and I learned a lot.
Making Fiberglass Wingtips with a Male Mold
Source: 2016 Q1 Beartracks, Mike Swain
I want to offer this disclaimer, prior to this excursion into wingtip making my composite experience was limited to patching a few screw holes in boats over the years. My objective is not to save money or time by building my own wingtips; I want to learn and hopefully end up with something unique. I wanted Hoerner style wingtips, primarily because I like the way they look, but there are some purported performance advantages over rounded. The Hoerner shape also lends itself to housing the Bob Archer style VOR antennas I made.

Stuff You’ll Need:
- MDF to make 2 full size airfoil forms
- Enough foam to make 2 wingtips the thickness you require
- Fiberglass Cloth & Resin (Epoxy or Vinylester)
- QuickFair or filler of your making
- Lightweight spackle or Polyurethane+Microballoons
- Sandpaper – I suggest 80 – 120 – 220
- Nichrome wire – 22 gauge
- Foil Tape, min 1.5 inch wide
- Power source for hotwire – Battery Charger, etc.
- High Build Primer
To start, I rough cut a piece of MDF and set it up against the outboard edge of my wing and traced the airfoil with a sharpie. I cut to the line using a band saw and jig saw. I then used a random orbital sander to finish until the line was just gone.
My plan was to mount the tips flush, not overlap, so I reduced the form by another .0625″ to allow for the fiberglass layup thickness. I drew a line .0625 in from the edge by using a scrap piece of aluminum the correct thickness and dragging it around the form with a sharpie. I then sanded the form down to the new line. Because I need two identical forms to hotwire the foam, I traced the completed form onto another piece of MDF and rough cut. Using a few screws, I screwed the two pieces of MDF together and used a flush cut router bit to make an exact copy of the first form.
The two forms will sandwich the foam and the hotwire will glide along the forms resulting in a airfoil shaped block of foam. The two forms need to be exactly in line with each other during this process. I am sure there are many ways to ensure the forms are inline, but I simply match drilled the forms with a couple of 3/8 guide holes while the forms were screwed together which threaded rod will go through lat-er in the process.
I made my wingtips 10″ wide, primarily because a single 4’x8′ sheet of 2″ foam supplied enough material. But you can make them any width you want, just glue together enough foam.


Using a framing square, I laid out lines on my workbench to match the distance between the 3/8 guide holes in the forms. The width of my wingtips are 10″, so the layout is 10″ + 1.5″ to account for the 2 MDF forms. I then made 4 supports from some scrap 1×2, 2 for the front and 2 for the rear. The pairs were match drilled and long enough to suspend the forms and foam in the air over my bench. I drilled the 4 sup-ports with a Kreg jig I use for wood joinery, but it’s perfect for attaching wood at right angles. You’ll also want to ensure the ends mounting down to your work surface are square, I cut mine using a chop saw.
I used one of the airfoil forms to trace the airfoil 5 times on my 4’x8′ sheet of 2″ thick polystyrene foam I picked up at Home Depot. I also drilled the foam through the 3/8 guide holes while I was tracing the airfoil. I rough cut the sheet into 5 pieces using the tracings in the previous step. I used an old hand saw I had laying around.
The foam I purchased had foil on 1 side and plastic on the other. I peeled this off so I could glue the 2″ pieces together to get 10″ total. I used 3M 78, which is a foam-safe spray adhesive. If you use a different glue, test it on some scrap foam, because many of the solvents in glue will eat polystyrene, especially the spray adhesives.
To glue everything together, I ran 2 threaded rods up through the guide holes on one of the forms so the rods were sticking up in the air. I slipped the first piece of foam down over the rods then sprayed the inside end with adhesive along with the subsequent joining end of the next piece. Rinse and repeat until you get to the last piece. You don’t want adhesive on the outside ends be-tween the forms and foam, we just want to glue the pieces of foam together to get our desired thickness. I slipped the second form onto the rods and snugged the whole assembly together while the adhesive dried. I went for tight but I didn’t want to crush the foam.
Once the adhesive is set, you are ready to hotwire. I set up the assembly using the 4 supports screwed down to my workbench, so the forms and foam are suspended over my bench.
I made a hotwire tool with a scrap piece of 1×2 and some scrap fuel strap (.025 4130 bent at 90 degrees) It needs to be wide enough for the width of wingtip you are building. You want the wire to glide along the two MDF forms. I purchased the Nichrome wire from Amazon. The wire needs to be as tight as possible. For a power source I used a car charger. It seems the newer digital chargers are smarter than the old dumb transformer types, so I used an old 12V UPS battery to trick my charger into putting out the juice.
Once you have your hotwire tool ready, it’s time to cut some foam. The idea is to have the wire glide along the top of your forms at a nice slow steady pace. Not too fast to drag the wire, but not too slow where you burn excessive foam. You can fix most imperfections when you fill the foam, but try to get a clean cut. Do one side, then flip the whole assembly in your supports and do the other side. Take it out of the fixture and you now have an airfoil shaped chunk of foam the thickness of your planned wingtip.
Now we will create the Hoerner shape. To do this, we will apply foil tape along the edge of the foam for the hotwire to ride on. On the lower inboard side of the wingtip, I made a line 1 inch from the edge. I carried this to about the center of the front of the air-foil. Now on the TOP of the OUTBOARD edge of the airfoil, I came down about .25″ inch from the edge. There is nothing hard and fast about .25. but this will determine the thickness of the outboard edge of the wingtip. If you want thicker, make the dimension bigger.(right)
To hotwire this, I plunged the hotwire into the foam until just making contact with the foil tape, then gently drug the wire trying my best to keep the wire square for a nice even pull. The video shows this in more detail.
Now you’ve got a funny looking airfoil-hoerner sculpture (above). The next step is to put the front radius on. From this point on it’s more up to you and how you want the final shape to be. I followed the convention outlined in the video (https://youtu.be/RoOh-fgI8oU) which is to use the width of the wingtip as the radius of the front curve, 10″ in my case. I am happy with the look and the way it came out. I used a piece of safety wire around a sharpie to draw the 10″ radius from the front inboard edge of the airfoil to outside edge. I then used my hotwire tool held vertical to the foam and rough cut the radius.
You will end up with a blunt edge on the front of the airfoil where you cut the radius. Use a rough file or rasp to blend this blunt edge into the existing airfoil. I went ahead and ever so slightly radiused the outboard edge of the wingtip to the point where the airfoil is the thickest. Seems to be about 1/3 of the way back from the front. This was done by eyeball until I got a pleasing shape.
I then used some 80 grit sandpaper to rough sand any ripples from hotwire and generally level the foam. I used some 120 to put a nice radius on the outboard edge of the wingtip. You don’t want any sharp edges since wet fiberglass will pull away if you try to layup over a sharper corner.
I then used some lightweight spackle to go over the form. Then a process of sand, fill, sand, and fill. You want a nice smooth surface under the layup. Any imperfection will transfer into the fiberglass. I read in the Bingelis book that Polyurethane mixed with Microballoons makes a good mix to cover foam forms. I had already used spackle before I found that tidbit, but you might want to explore that method. You’ll want to make sure the entire form is covered, because paint and certain resins will eat foam.

After getting things as smooth as possible, I put a couple of coats of rattle can spray paint. I used orange because I wanted to be able to see the form as I was laying up, to make sure there were no air bubbles.
To prep for layup, I waxed the painted form with 4 coats of good carnuba car wax I had in the garage. I then sprayed 3 coats of PVA mold release.
My layup schedule was 4 layers of 8.8 oz Bi-directional cloth from Aircraft Spruce (PN 01-00642). There was no science in that choice, just a guess. They seem to be pretty sturdy and came out around 7 lbs. each.
I used System 3 Silver Tip Epoxy as my laminating resin. It is a popular choice among home boat-builders. No amine blush and simple 2:1 mix ratio. It can also be post-cured at higher temps to improve the structural properties, which is a bonus for room-temp cured epoxies. Make sure your foam is 100% protected if you use Polyester or some other non-foam safe resin…..or all that hard work will melt away.

I will not go into detail on attachment, but I ended up using piano hinges. I didn’t want to have to undo a bunch of screws every year at annual. I followed the steps the RV guys have outlined. The only exception is I built an access panel on the top of the wingtip to access the hinge pins, since the Bearhawk’s tip rib extends all the way back, unlike the RV method of securing the hinge pins.
I followed this method: http://goo.gl/lRg0i2. I used .040 strip of 2024 as my spacer, since there is no cutting of these wingtips. Also, since there is no gelcoat on my homebuilt wingtips, they were translucent enough for me to mark the hinge and drill based on marking on the hinge.
Once I had the wingtip mounted, I used Quick Fair (a commercial fairing compound) to level and get a nice surface on the wingtips. This requires several thin coats and lots of sanding. I use a 3M semiflexible longboard. 80 grit for rough, then 120, then 220. Depending on the quality of finish you want will determine how much time is spent here.
I applied high build epoxy primer next, sanding between coats, until i got a perfect surface. Once you are happy, they are ready to be painted or further modified for lights, etc.
I will be making cutouts and fabricating lenses next. My landing, strobe and position lights will be housed in each wingtip. I hope to write up those steps in a future article.

Mounting Instructions for Wing Tips
Source: 1996 Beartracks, Bob Barrows
The wing tips may be installed by overlapping the wing tip rib (see sketch #1) or installed flush with wing skin (see sketch #2). Use aluminum pop rivets or #6-32 screws with nut plates to attach wing tips.
Fiberglass Wingtips Male Mold Construction
Source: 1996 Beartracks, Bob Barrows
Many of you may be ready for the details on wing tip construction. This article will give you a good idea as to what is needed to construct your own tips. There are many texts available on the finer points of fiberglass layup so we will not get in to this area too deeply.
1/4″ plywood is glued to the 3/4″ base plate on the mean line insuring squareness to each other.
Fill in-between form with foam and shape as desired. Cover with fiberglass and sand smooth. The mold is now finished. Two molds, left & right need to be made.
The wing tips can now be made by laying up three layers of 7.5oz. fiberglass cloth and resin over the waxed molds. Sand outside of wing tip to desired finish and remove from molds. These wing tips take quite a lot of work to make. You may best consider buying from T.Q. Fiberglass Products listed in the suppliers section.

