Notes About Making the Fiberglass Windshield Fairing

Source: 2026 Issue 1 Beartracks, David Kragnes

Finally got to windshield install. Thought I might have some tips.
I have built 3 boats, don’t ask why I spent time on something that doesn’t fly, so when I got to the lay up of the windshield faring I thought I might have some worthwhile tips. The plans lay out good advice for prep of the windshield and cowling. 
I have used System Three so my thoughts focus on that type of epoxy. I believe West Systems behaves much the same. Once you have the windshield in place and the area taped and waxed, mix up about 1/5 cup of epoxy, the bottom 1/3 of an empty beverage can is the perfect mixing cup, plan ahead you don’t want to have to stop the process to empty more mixing cups, have the cut cloth strips and a 1 inch stiff bristle brush ready. Wear rubber disposable gloves. 
You don’t need to make a big mess. Lightly paint epoxy down the center of the area, press the first layer of dry cloth on the damp surface then use the stiff brush to stipple, dab a little at a time, epoxy into the cloth only wetting till it is clear. You want to see the weave. Remember the cloth is the strength so keep it as dry as you can and have the cloth turn clear. Now in a 70ish degree shop wait 2 hours. You can save the brush in a can soaking in MEK. 
Mix the next batch and repeat. Inside a day the epoxy will bond and letting it set a little will make the next layer easier. If you catch it just as it is firm but tacky, shop temperature will dictate the time. the next layer will stick nicely in place for you to stipple. Dry is good but cloth should go clear with no bubbles underneath, again being in the right time frame makes it easier as you can push down a bump if it is cottage cheese or so consistency. Start early in a day and this will all time out nicely. 
When you are happy with the number of layers again give it a couple hours. Now since you have been a good craftsman the last layer looks like you can see the weave, as you start sanding you don’t want the first thing cut to be the cloth (reducing strength), so mix a little epoxy with thickener, micro balloons or wood flour, till you have thin peanut butter, and paint a nice smooth finish on the surface. This will give a nice layer to do less sanding on. 

Beartracks 2026 Issue 1 – Technical Q&A with Bob

Technical Q&A With Bob
Builder Matthew Brennan asks about Bob’s use of aramid composite floorboards in his latest plane, instead of aluminum. Matthew says, “Curious if the Kevlar floorboards “sound” any different than aluminum when in flight.  Is “drumming” reduced?”
Bob says, “I wear ear plugs when I fly and it’s hard to tell for sure due to all of the rest of the noise, but the composite floorboards should help dampen some of the noise.”

Builder Collin McDonald noticed some ambiguity about the hardware to use when securing the round tailwheel spring to the fuselage, and made a post on the forum to seek clarity. Should those be AN5 or AN6 bolts? 
Bob says, “We’ve used 5/16 and we’ve used 3/8 bolts there, and we’ve never had any problems with those bolts. We’ve used 5/16 on the lighter planes and 3/8 on the heavier planes.” Bob has used 5/16 bolts there on his own planes, and adds, “That stinger is hardened steel. It’s a really big job to drill those out. You don’t want to have to do that.”

Making Bending Dies to Bend a Radius to Fit Around a Tube

You are not yet authorized to view this page. Learn more here.

Winter 2024 Update from Bob Barrows – Companion Progress

Source: 2024Q4 Beartracks
Bob’s Bearhawk Companion is looking more and more like an airplane. During our October visit, the weight was 1010 pounds, as pictured. In November, Bob broke some bones in his foot, and that has limited his shop hours. Thankfully the cast was removed a few days ago and in the coming weeks he can rebuild strength and spend more time in the shop. He is currently working on the exhaust and baffling. I asked whether he used a kit for baffling, and he said no. He enjoys the challenge of making a custom baffling set for each installation, and is also somewhat particular about how he wants it to turn out. He says, “When you already have an airplane to fly, it doesn’t matter that it takes a little longer.” He enjoys building things and likes the rewarding feedback that comes from consistent input to a project. There is fun and a sense of accomplishment in seeing it come together. The new Companion has several interesting features including Kevlar composite floorboards. Their translucence is displayed with the belly pan removed. The door skins are carbon fiber, and the mouse door hinge is a strip of Kevlar layup.

Summer 2024 Updates from Bob Barrows

Source: 2024 Q2 Beartracks
Work continues on Bob’s Companion project. As of press time he did a preliminary installation of the wings and has mostly completed the cowling. There is a mock-up engine that has no cylinders in place, and he has validated alignment and positioning of the engine, and is quite pleased with the kit’s conformation to the plans. The ailerons, flaps, rudder are covered, and the elevators and horizontal stabilizer are in progress. With the mock-up engine in place, the weight was 767 pounds. Bob feels like he is on track to meet the target empty weight of 1050 pounds. This build uses carbon fiber door panels instead of aluminum. Bob says it saves a little weight, and he’s pleased with how the carbon panels flex, drill, and otherwise behave much like aluminum would. To make them, he starts with a flat sheet of aluminum. He says you can also bend the aluminum if you want the part to also be bent. He applies lots of wax to the aluminum, draws out an outline of the rough shape of the panel, and paints resin onto the panel. Then he lays 2-3 layers of carbon onto the panel, and the next day, it’s ready for cutting to shape and installing. He made similar floor boards out of Kevlar, and figures those are 2/3 to 1/2 the weight of aluminum in the same application.
Bob and Diana recently flew the Patrol to Pence Springs, West Virginia for a get-together that included around 30 airplanes. They have a nice long grass strip there. Diana’s improved mobility and health are great news. She’s always eager to ride along whenever Bob flies. He says he alternates between flying his Patrol and LSA, just to keep both active, and enjoys both equally.
He has not been working much on his electric Ultralight project. It is still pending a new motor controller to up the motor output from 230 to 300 amps. Bob did design and build a new full-castering tailwheel for it, to improve taxi handling. The new tailwheel doesn’t attach to the rudder for steering but is easier to maneuver than the original skid. Bob says back when he flew his RV3 the tailwheel could either be swiveling or steerable, so he usually left the chains off and allowed it to swivel so that he could turn around more readily at the end of the runway.
Bob has been working on a solution for the Brake master cylinders that uses an EDM (electrical discharge machining) machine to make very precise fluid passageways inside of the bore. The EDM machine is well-suited for this kind of work and yields very smooth and precise shapes down inside the bore, based on the shape of a custom electrode.
Save the date for Bob’s Picnic on 10/19/2024 at VA04!

Cabin Organization with MOLLE

Source: 2024 Q2 Beartracks, Tyler Williams
I like clean organized spaces. Well, at least I do in my airplane and in my kitchen. My truck, on the other hand, is a complete mess…always. It looks like I live in it, which sometimes I do. But not a lot goes on inside the truck that forces me to be meticulous about it being clean and organized. I sit, hold the wheel, throw the snacks in the center console and turn on some good tunes. My kitchen is a different story. My chef’s knife is sharp, my spices are stocked and I am a stickler for “mis en place.” When everything is in its place, I can work efficiently and get into a flow to create, improvise and make great food.
Operating the airplane is a similar experience for me. I like everything in its place, the plane prepped and my mind sharp for the task at hand. Flying a plane, at least the way I do it, involves much more than road tripping in the truck. I don’t just get in, hold the wheel and follow the line on the map. From the preflight, to the engine management, to flying the terrain and improvising the route around weather and airspace, to chatting with ATC and jotting down instructions, there’s always something to do. An organized cockpit helps keep the mind free for the important things, and I don’t like anything flopping around loose. When flying far, I need water, a bag of snacks, sometimes a pen and paper, sometimes I need my flashlight, I’ve got my InReach on and I like to plug in my phone for music. I keep a lot of stuff in the back of the airplane too and it all needs a secure place to rest. From the basic things like a screwdriver, fuel tester and a small flashlight that get used every preflight, to the just-in-case tool kit, spare fasteners, tubes and patches, to control locks, tie downs, travel chocks and a first aid kit, I like to have what I need, when I need it. You can usually find help anywhere in the lower 48, but it sure is nice to have what you need to handle things, in flight and on the ground.
When I finished the Bearhawk and started venturing across state lines, I kept all the tool kits and spares in a duffel bag in the baggage area. But, digging through a bag of stuff to find what you can be annoying at best. For the cockpit items, I initially used the side pockets installed by my feet and the seat back pockets to stow checklists, small items, snacks and water bottles. But we travel as a family often and I like to keep those seat back pockets clear for my kids to stow their drawing paper, books, cards and such. My side pocket is best kept minimal so I can get my checklist or writing pad without fumbling around down there while trying to fly and my wife likes to have her side available for her magazine or book.
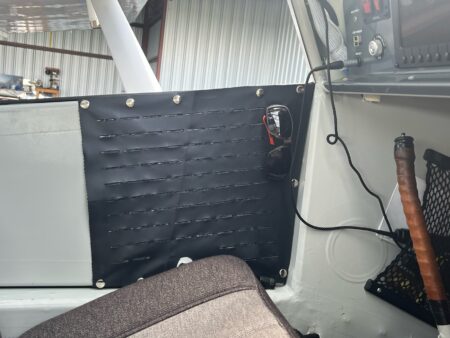
I got some inspiration from some nice overland camper trucks that used the MOLLE (Modular Lightweight Load-carrying Equipment) system to organize gear and tools. I saw seat-back MOLLE panels with small pouches and also some nice tailgate MOLLE panels for easy access to tools, even when the truck is loaded with gear. That seemed like the perfect solution for my plane. Our doors are all recessed slightly from the interior so there’s a little space there that can be used to hang a MOLLE panel and install some organizers.
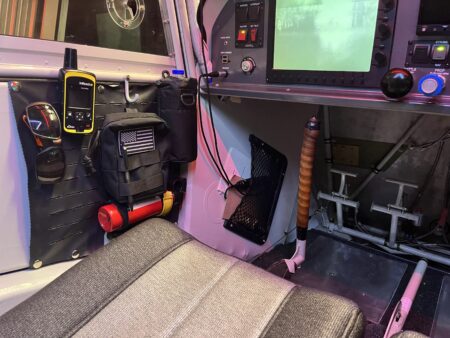
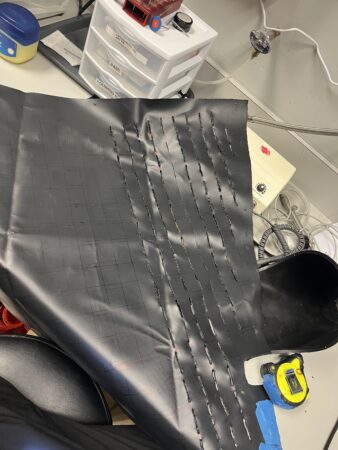
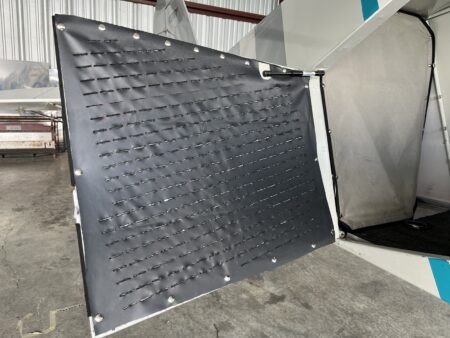
I made mine out of PVC coated Cordura nylon. I found some basic dimensions for the standard laser-cut Molle grid, drew it out on the fabric and simply melted the slits with a soldering iron. Mine are 1.12” wide slits, spaced ¼” apart horizontally and 1” apart vertically. I probably don’t have the exact military spec, but it was easy to lay out and fits all the attachments well. Someone more digital savvy could do the layout on a computer and have the fabric laser cut for a faster and more precise, factory looking result. I installed snaps in the door frames and fabric and snapped on the panels. They are lightweight and work great. Up front, I have my water bottle holder, sunglasses, pen, charge cord pouch, a place to keep my phone and snacks and my fire extinguisher secured on the door for easy access and still have all the elbow room I need. The passenger door has a panel as well with the same drink holder and stuff pouches and my wife loves it. The big panel on the aft baggage door stores my first aid kit, gust locks, travel chocks, extra quart of oil and funnel, preflight tools, hanging luggage scale, spare fuel cap, pitot cover, etc. etc. You can certainly stuff all these things under the back seat and that works just fine. But it sure is nice when the plane is fully loaded to be able to just pop the baggage door open and grab what you need.